#tutorial instagram
Explore tagged Tumblr posts
Visit Tumblr Blog
Explore Tumblr blogs with no restrictions, modern design and the best experience.
Last Seen Tumblr Blogs


Fun Fact
Tumblr is used by 21% of adults online aged 18-29 years.
Text

weekend at trucy's 🫶
#maya fey#franziska von karma#pearl fey#trucy wright#ace attorney#.png#super girl slumber party MAMBO NO. 5!#or something. idk#i've been imagining this for a while bc i keep getting hairstyle tutorials on instagram LOL#but god. drawing four characters.... my hand is NUMB!
3K notes
·
View notes
Note
¿oodrías hacer un tutorial de cómo difuminar el marco de las fotos tipo así, por favor?

holii, ahí te grabe uno. no se si me explique bien, pero de esa manera es muy fácil para mi. solo le pones filtros a una foto de color, los que le puse son para difuminarlos (depende del gusto de cada uno de como ajustarlos) luego le pones la foto arriba y con la flechita de al lado del candado la superpones y ya esta.
(ignoren lo de capcut 💔💔)
si no quieres que la foto quede tan visible, por así decirlo, le bajas la opacidad (lo marcado en rojo)

espero que te sea de ayuda. cualquier duda que tengas, puedes escribirme por aquí o por mi ig 👊🏻!!
#fakeland#rp moodboard#tropical moodboard#kpop moodboard#tropical#kpop#moodboard#random moodboard#argentina#brasil#my edit#photo edit#editblr#edit#short bios#kpop bios#messy bios#messy icons#messy layouts#messy moodboard#instagram#tutorial
297 notes
·
View notes
Text


139 notes
·
View notes
Text
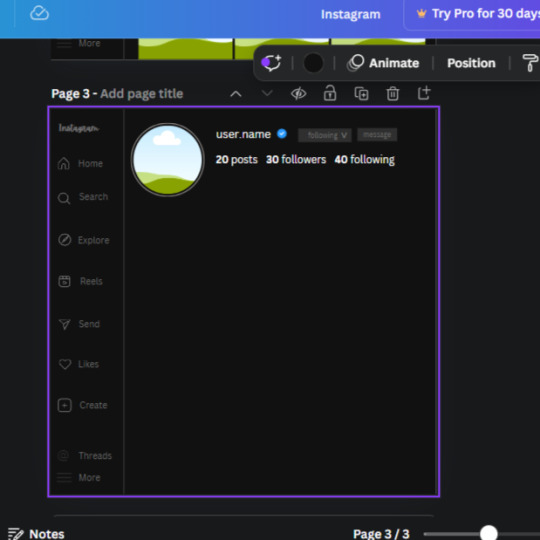
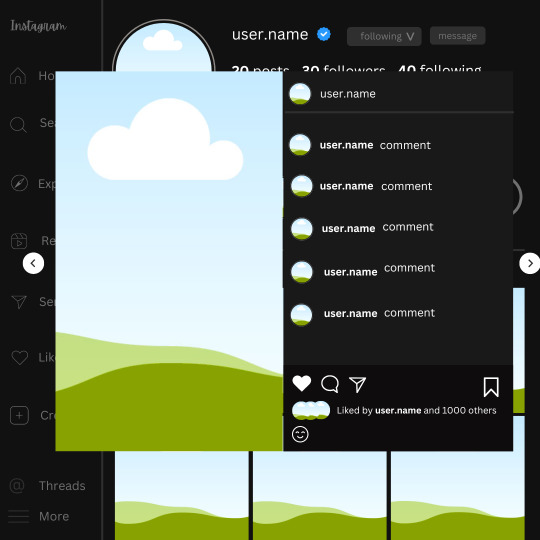
𓈒༷♪˚.✧ How to make a mockup like this for smaus, ocs, etc. (step-by-step tutorial ☆ no Photoshop, easy, free) (requested by @lovebittenbyevans) ✿
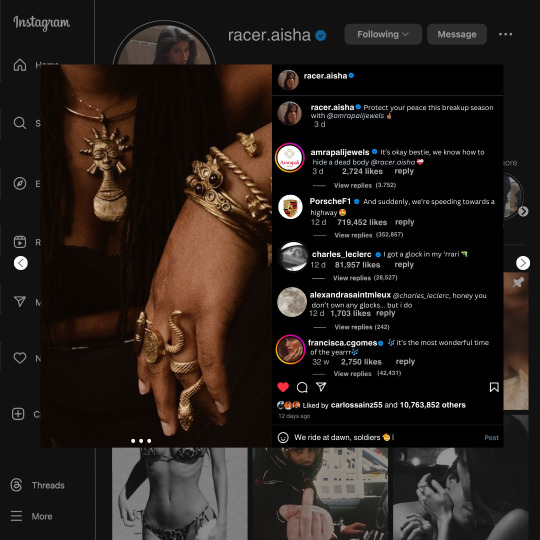
guys this took me two hours to make and you could probably get this done in like, 30 minutes :) I hope this is coherent <3 Please look back this image for comparisons, if my explanation is not well explained, etc.
first of all, if you dont already have one, make a free canva acount. once you're signed in, hit the purple "create design" button on the sidebar. A pop-up will appear with different design template options. For this design, we want the dimentions to be 1080 x 1080, so you can either make a custom size or choose the instagram post (square) template by either searching or scrolling through the list.

2. Now you have a blank page. Zoom in with the slider at the bottom of the page if you need to (Mine is currently zoomed in 41%). Click on the page and change the color to an off black (hex code #111111).
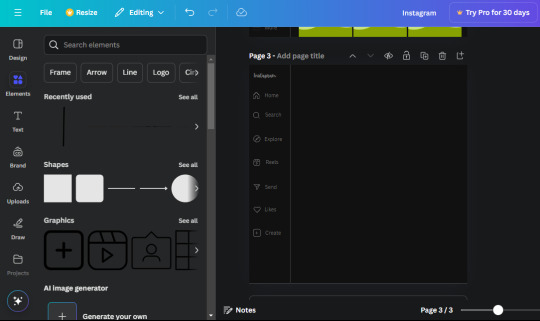
3. Now that the color is changed, click the "elements" tab and search "line". Click the shape and it will add it to the page automatically. These line are particularly hard to navigate and hard to get it at the right angle and length so this part might take a little longer than the rest.
4. stretch it from top to button and turn in a 90 angle so its straight on the left side of the page. Change the color of this as well to a grey tone (hex code #2F2F2F).
5. Now we'll add the Instagram logo. Click the "text" tab then click the purple "add text box" button. Write "Instagram" in the box and change the font to "apricots". This is the closest font I could find that resembled the logo font but if you find a better one, feel free to use that instead. Make the font size 19.3 (you can do this manually or do it in the text options). Change the color to grey color (hex code #707070). Add it to the upper left corner of the page like this:
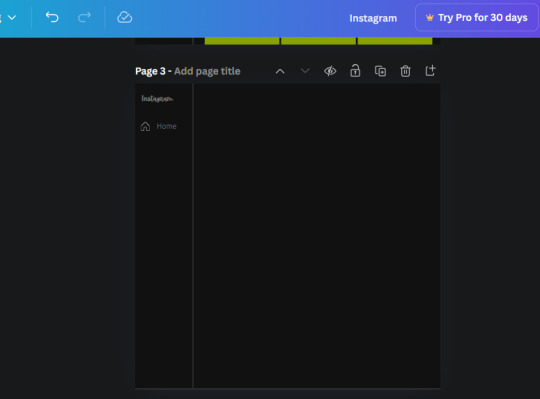
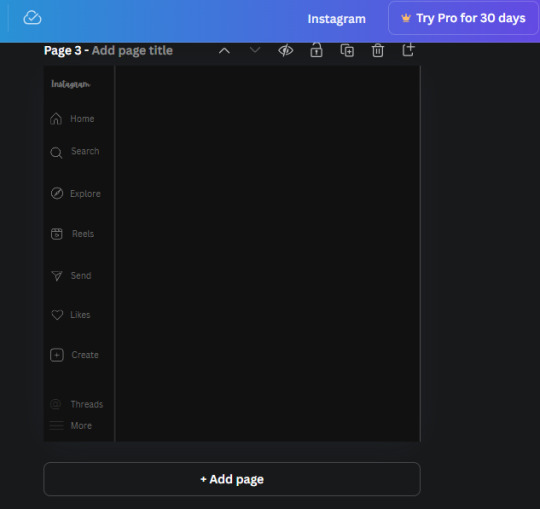
6. now we're adding icons and a menu inside the border we just made. Click the "elements" tab again and search for "instagram home icon" and add the element by sketchify to the page. Click the home icon, an options icon with pop-up above the page. Look for the "Position" button and click it. Scroll to find the advanced options and you can manually type in the width and height at 26.6 and 28.7.
Move it inside the border, under the logo (photo below). Change the color again (the hex code is #707070).
7. Open the text tab and add a text box. Change the font to Canva Sans and write "Home" in the box. Change the font size to 18.1 and align with with the house icon. It will look something like this,
8. Go into the elements tab again and search "instagram search icon". Scroll until you find the one by sketchify and add it to the page.
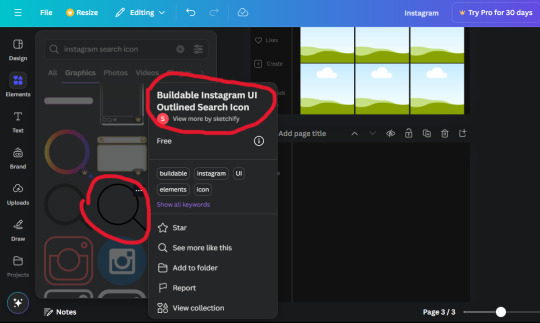
9. Shrink it so the W and H is at 36.6 and 31.3. Move it below the home icon until a purple "67" pop ups and aligns under it. Change it to the same color as the Home text and icon (#707070). Go ahead and Duplicate the the "Home" text box and clicking it and a pop-up will show up then edit the text so it says "Search" and align with the searcch icon we just added.
10. You know the drill. We are continuing to search up more icons in the "elements" tab. Search "instagram compass icon" and choose the one by sketchify (are u seeing the pattern?). Add it to the page and change the width and heigth to 33.1. align it under the search icon just like how we did before and change it to the say colors as the other icons.
11. Do the same as before and write "Explore" in a text box and align it with the icon. We're doing the same thing for all of these.
We'll be using the same search prompt for all of these icons so just change the type of icon you're looking for like we've done before hand. Next look for the Instagram reel icon and add the outlined one by sketchify and change the W and H to 31.2 x 30.9. Change the color to the ones we've used before, align it underneath the icons above and add your text ("Reels").
12. The next icon is an outlined, "sent" one. W and H is 31.1 x 27. The text will say "Send". Then an heart outline by sketchify; W and H is 34.2 x 29.1 and the text is "Likes". Next is the "create" outline icon by sketchify, W and H is 36.8.
(p.s if you are struggling to align the icons and text correctly, shoot me a message and I'll send you the X and Y positions ;D)
If you followed it through, it should look like this,
13. Now onto step 13, we'll be adding the Threads logo. You don't have to add this but to make it look more like the actual website, I will be adding it. Open the "text" tab and add a text box. Write an "@" symbol in the box and change the font to Nanum Sqaure and the size to 24.9. Add in the bottom corner below all the icons we just added to our page. We need another text box now (Color is still #707070), write "Threads" and align it to the "@" symbol.
14. We're adding another icon now. Search "Instagram menu icon" and find a wireframe menu icon by sketchify. the W and H are 42.5 x 24.6. Add a text box that says "More". It will look like this:
We are a quarter way done now :D
15. Search in the elements tab "circle frame" and look for the one with a little border around it.

At first, the circle will be green and inside the circle will be white. Change the white to color of the background of the page (hex code #111111) then change the green to a grey color (#8D8986).
16. Add a new text box, change the font to Canva Sans and the size to 22.8 and the color is white. I just wrote "user.name" in the box. the W and H will be 153.3 x 35.7.
Enter the "elements" tab and search for a blue checkmark and find the icon by Victor Aguiar. The W and H is 28.1 by 28.
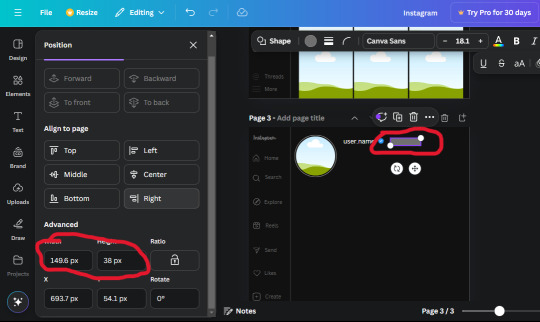
17. Search in the search box for a rectangular shape and add it to the page. Place it next to your username and checkmark icon and make the W and H to 149.6 x 38. Add another and place it next to the other rectangle shape. the W x H is 111.4 x 36.7.
Change the color of both boxes to #2F2F2F. Add a text box and write "following" then change the W and H to 82.6 x 21.8 and fit it inside the first box. Add a second text box and write "message" in it then change the W and H to 77.8 x 21.8. Change both text colors to #7A7A7A

18. Add another text box. Write "<" and turn it upside down and place it beside the "following" text inside the rectangle. Adjust the size as you need to. I also like the round the corners to around 8 so its not so pointy and square.
19. Add 3 new text boxes. Write the amount of posts, the amount of accounts you're following and the amount of followers your have. Write "20 posts", "30 following" "40 followers". Bold the numbers and change the text W and H to 116.4 x 32.7. These are just place holders that I use.
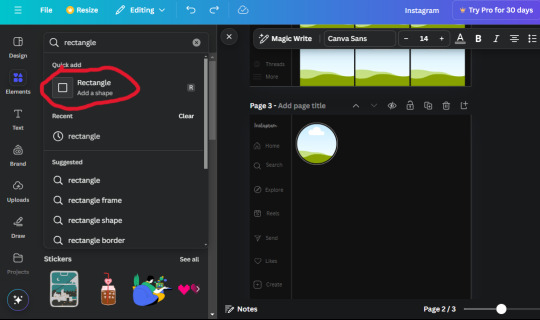
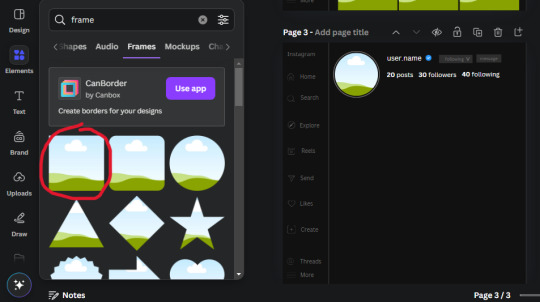
20. Open the "elements" tab again and search "frame". Choose the first one.
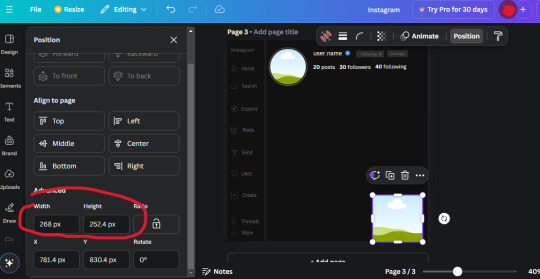
We want the height and width to be 268 x 252.4. Place it at the bottom of the page but we want some space between the frame and the page.
Now we'll duplicate the frame we just placed (the icon between the comment and trash can on the pop up above the frame). Place it next to the previous frame but we want to leave a bit of space between them like this:
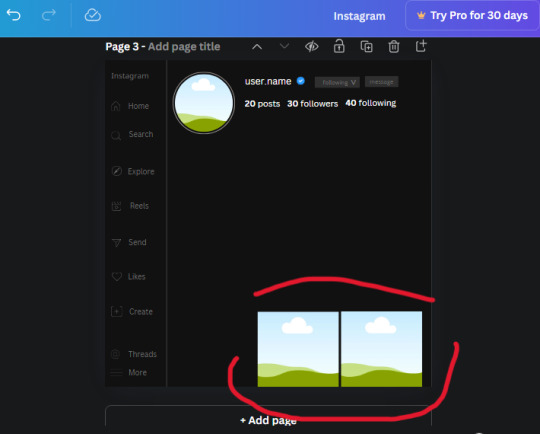
If its a little wonky, don't worry. You can always adjust it so it looks right.
Duplicate the frame again and place it next the second frame you just placed, same distance between. Make sure they're even. Now we have a row.
Select all three frames and duplicate them. Move them above our original frames but leave a little space between them.
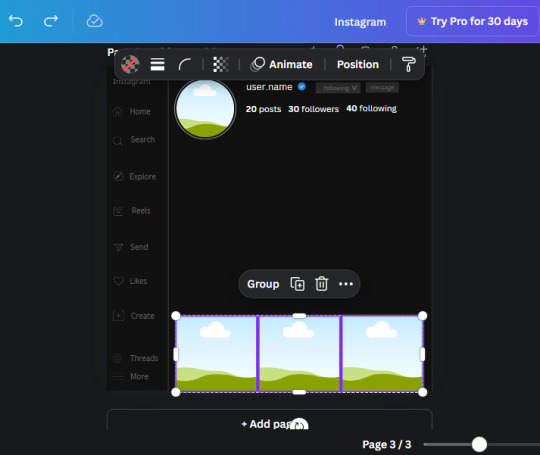

Again, if they're uneven, adjust them as you need to.
21. Select the line again from the elements tab. Stretch starting from the top frame to the last frame and make the color grey (#2F2F2F).
Because the line is stupid hard to navigate, use something like a text box to mark where you want it to end like this:


Delete the text box and the line with be where we want it.
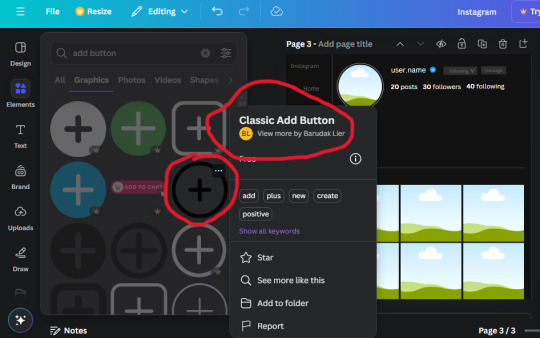
22. On to the highlight reels. Seach for "add button" and find the one by Barudak Lier.
Change the heigh and width to 81.1 and move it above the border.
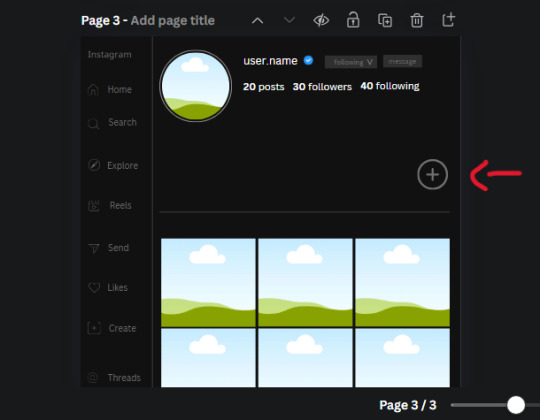
Search for circle frames now and add this one to the page (The same one we used for the pfp), change the width and height to 85.4 and move it next to the add button. Since this is a generic, blank template, I add about 4 of these highlight frames but you can do however many you want. You can change the border color to a gradient or leave it grey.
Add a text box now. The font will be Canva Sans, the size will be 18.1 and the color will be white. Change the text to "Add" and place it under our add button. Make more of these text boxes to place under the circle frames. Depending on which frame its under, write "Highlight 1", "Highlight 2", etc. etc. or you can give them different names and such.
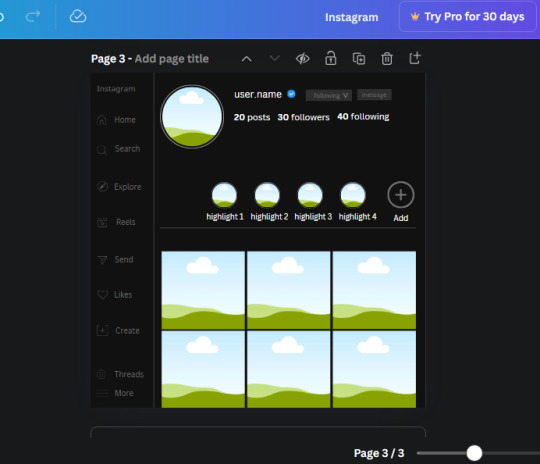
23. Add another text box, write "name" and bold it, change the size to 19.1 and the W and H to 69.2 x 28.8. The font will be Canva Sans and the color will be white. It will go under the amount of posts, followings and followers.
Add another box. The font is Canva Sans, font size to 20.1, the W and H is 40.8 x 31.3 and the color is white as well. This is our "bio". Place it under "name".

Yay!🎉🎉🎉 You're halfway done!
24. Search for a shape in the elements. Look for the rectangle again and add it. Change the width and height to 460 x 760.4 and the color to an off black/grey color (#191919), placing it like this:
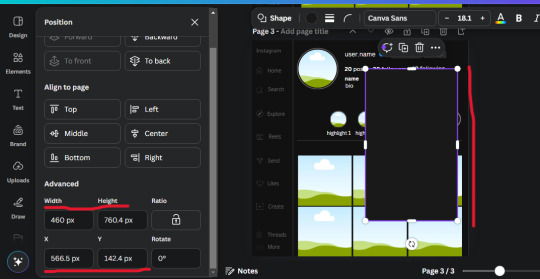
Get the same kind of square frame we used before to make the profile grid and make it the same size as the rectangle we just added. Place right up against the rectangle like it's its other half. Add another line like before and span across the upper half of the black rectangle as a border then add a circle frame inside the border.
Add a text box, "user.name" and align it with the frame. The text is white and the W and H is 111.5 x 25.9
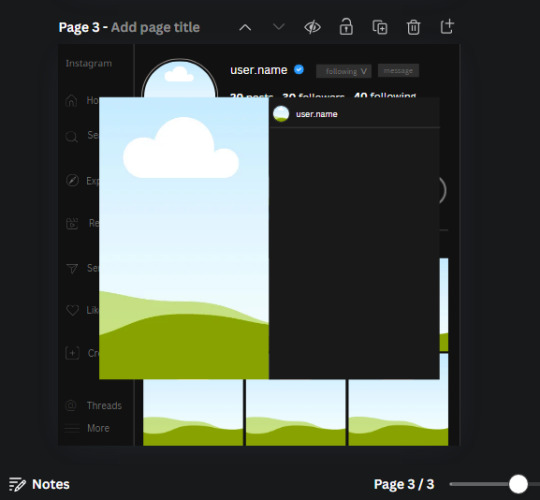
25. Add more circle frame along the inside of the rectangle to resemble the comment section. Make sure the W and H of the frames are 46.1.
Add more text boxes that align with the frames you just made and write "username" again and bold them. Add even more text boxes that align with the usernames and write "comment". These are place holders for when you decide to use this template.
Add another rectangle on the lower part of the rectangle and make the color black. and search for "instagram heart icon", "instagram comment icon" and "instagram send icon". Make sure the lines are thick. Find the heart icon by sketchify, and the the comment and send icon are by Mirazz Creations. Make the lines white and make sure the W and H are the following:
Heart icon: 38.7 x 32.9
Comment icon: 35.2 x 35. 8
Send icon: 35 x 32
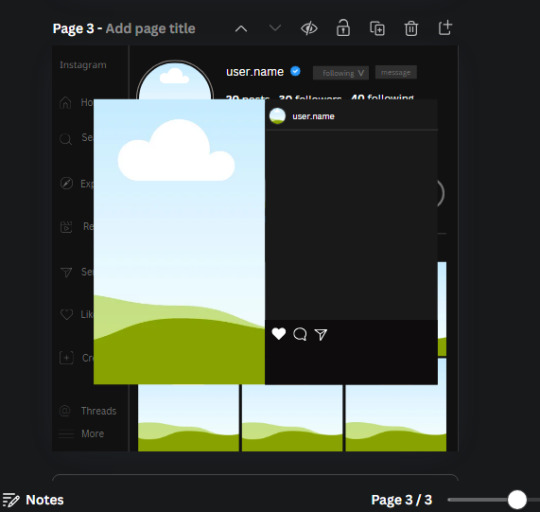
Next, look for "instagram bookmark icon" and find the one by Adricreative. Change the color to white and the W and H to 29.7 x 40.2. Move it to the other end of the rectangle.
26. Now add three circles frames and change the W and H to 37.2. Move them below the heart icon and have them overlap each other some. Then, add a text box and write "liked by username and 1000 others". Change the font size to 13.6 and change the font to Canva sans. the color will be white. Align this with the three overlapped frames.
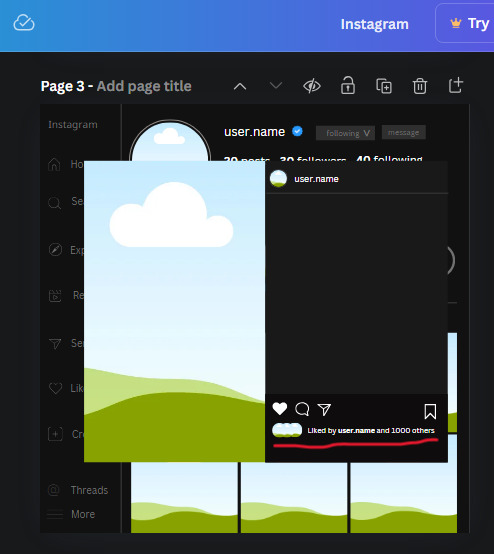
27. Look in the elements tab for an emoji icon and choose the one by Soni Soukell from Noun Project. The W and H will be 32.8 and the color is white.

Now add a another text box and write "Write a comment". The color will be white, the font size will be 14.2 and align with the emoji icon you just placed.
Search for "next arrow button" by Pixeden and make the W and H 42.8 then add it to both sides of the post.
And you're all done with your template! All that is left to do is fill it but before doing that, duplicate the page so you always have an extra blank mockup if you want to use it again.
To fill the frames, upload an image (or use a Canva stock photo), drag and hover it over the frame and it will fill the frame.
Hope this was helpful and you you successfully made one :D <3
#requests#text#smau#template#mockup#moodboard#instagram#instagram moodboard#instagram mockup#graphic design#canva#psd#free tutorial#tutorial#instagram au#social media au#free psd#photoshop#resources#fanfiction resources#graphic design resources#graphic design tutorial#psd tutorial#photoshop tutorial#au#au ideas#mockups#digital design#digital design tutorial
169 notes
·
View notes
Text


#edits#fakeland#artists on tumblr#news#instagram#ibispaintx#my art#like#beauttiful girls#jennie#my edit#tropical#icons#pinterest#kpop icons#kpop#parati#tutorial#plantillas#random#digital artist#kpop gg#moodboard#my post#my icons
126 notes
·
View notes
Text
250307 Big Hit's Tweet, TikTok and Instagram Reel
쩨호오오오옵 사랑해, 사랑한다고😮 나랑 챌린지 찍자~!!! 🔗 #jhope x #Jin: https://vt.tiktok.com/ZSMCWrqgm/ 🕺j-hope's Dance Tutorial: https://vt.tiktok.com/ZSMCWqha5/ #진 #제이홉 #jhope_SweetDreams
J-hoooope I love you, I LOVE YOU😮Let's do a challenge together~~~!!!
🔗 #jhope x #Jin: https://vt.tiktok.com/ZSMCWrqgm/ 🕺j-hope's Dance Tutorial: https://vt.tiktok.com/ZSMCWqha5/
#Jin #Jhope #jhope_SweetDreams
Trans cr; Aditi @ bts-trans © TAKE OUT WITH FULL CREDITS
#250307#j-hope#hosoek#hobi#jin#soekjin#2seoks#tiktok#jhope_SweetDreams#dance challenge#dance tutorial#please use the link to view the dance tutorial#bc Tumblr only allows one video per post#bts#bangtan#bighit#official#twitter#instagram
57 notes
·
View notes
Note
I would love an idea for a 2014 tumblr filter through some app, VSCO maybe

2014 travel VSCO filter ♡
Feel free to check out my master list of filters here! 💗

Filter: T1: 10
Exposure: +1.5
Contrast: -1.0
Temperature: +1.0
Tint: +0.5
Skin tone: +0.5
(Optional) Fade: +2.0
* You can adjust these settings to your liking!
💋 Taglisters: @2543jj @lou007sstuff @cottoncandywhispers @bambibabydoll123
#2014 filters#2014 filter#2014 filter tutorial#2014 aesthetic#vsco#vsco filter#rosy blog#2013 aesthetic#i miss 2013#2014#2013#2014 tumblr#2013 tumblr#2015#2014core#2014 girl#i miss 2014#2014 vibes#bring back 2014#2014 nostalgia#tumblr 2014#2014 summer#2014 revival#2015 blog#2015 aesthetic#2015 tumblr#2014 instagram#lizzy grant#ask#request
169 notes
·
View notes
Text

What does it mean when you can't stop doodling blond elf guy
107 notes
·
View notes
Text


✩ CARRD INSPO by LOVJBINI // © k4lify, yj4won
like or reblog if you useㅤෆㅤ2025.
✎﹏ please, put “ © k4lify, yj4won – tutorial by @lovjbini ” in the description if you use our tutorial!
CLICK HERE FOR TUTORIAL
#lovjbini#carrd#carrd.co#carrd co#carrd inspo#carrd tutorial#carrd template#carrd layout#carrd tutorials#carrd templates#carrd layouts#carrd theme#carrd themes#carrd design#carrd designs#carrd stuff#aesthetic#simple#kpop#pink aesthetic#soft moodboard#instagram#google themed#google
67 notes
·
View notes
Text
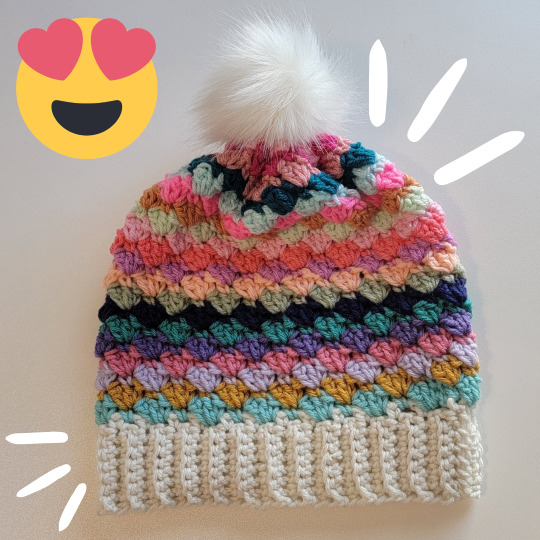


New video tutorial up on my YouTube channel on my First Crush Slouchy Hat! Find me on youtube @crochetmelovely! Like and subscribe! 💕😊✨️
This was supposed to be my May bonus monthly vid, but time got away from me 😅
youtube
Check out this playlist featuring more crochet Hat tutorials here!
#yarn#video#crochetvideos#crochet#crocheting#videos#crochetersofinstagram#instamood#tutorial#viral#crochetlove#crochetstitch#crochetstitches#crochetaddicted#designer#beautiful#love#youtubevideo#youtube#youtuber#instagood#youtubers#subscribe#followme#instagram#youtubechannel#create#crochetyoutube#handmade#Youtube
36 notes
·
View notes
Text
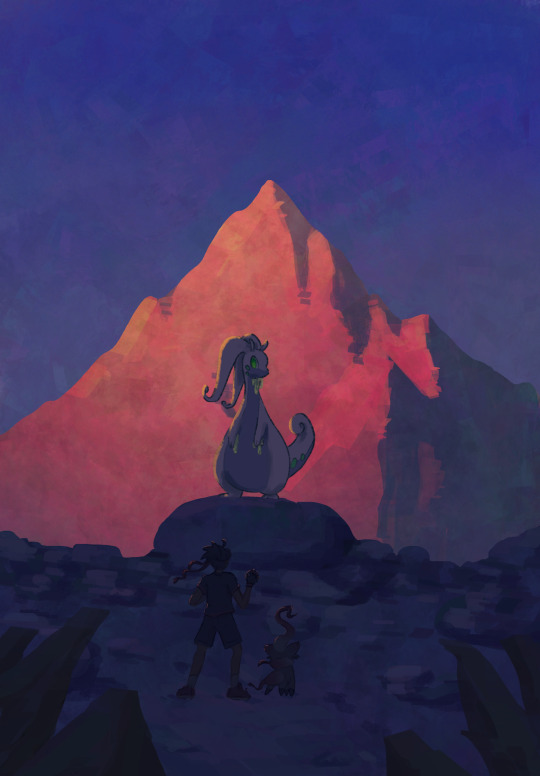
#pokemon#goodra#and of course the trainer is#wei wuxian#mdzs#for he is my blorbo#this was my attempt to follow a tutorial by derekdominicdsouza on Instagram.#I’ve been short of ideas so I figured no thoughts head empty follow instructions would be fun#I’m pretty happy with the goodra and the background#teleport warning draws
36 notes
·
View notes
Text
I’ve got 2 more lighting tips today: first one is something I call “soft rendering.” It gives that fuzzy, 90’s anime feel! I hope you all enjoy it! I’ll post the second lighting tip tonight!
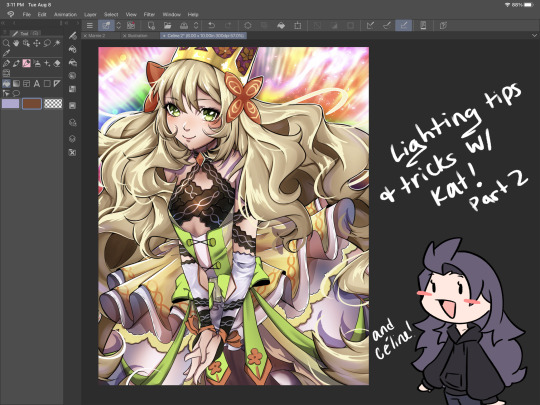

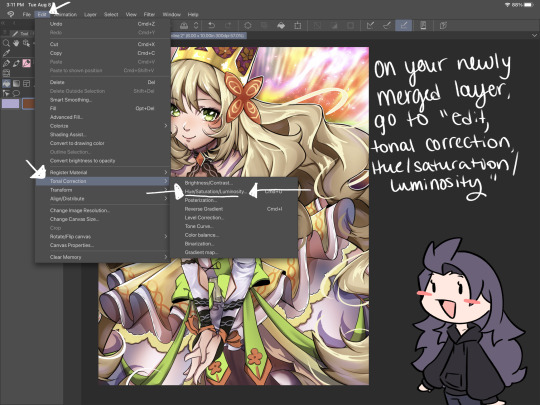
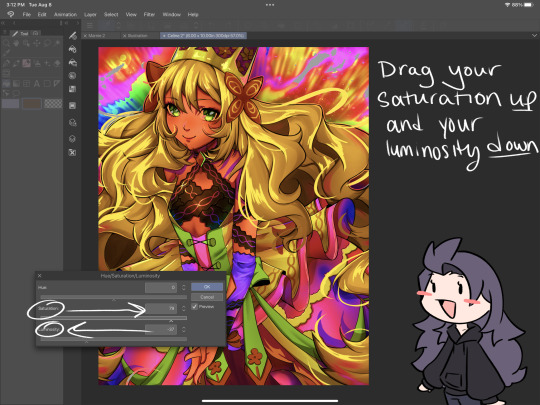
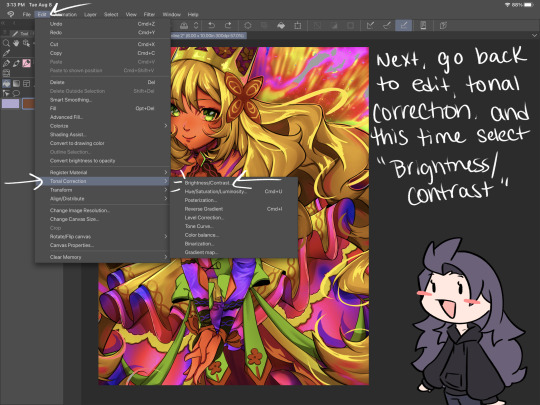

#smkittykat#smkittykat art tips and tricks#digital art#art ref#art reference#art tips#artists on instagram#artists on tumblr#artists on twitter#digital art tutorial#art tutorial
521 notes
·
View notes
Text

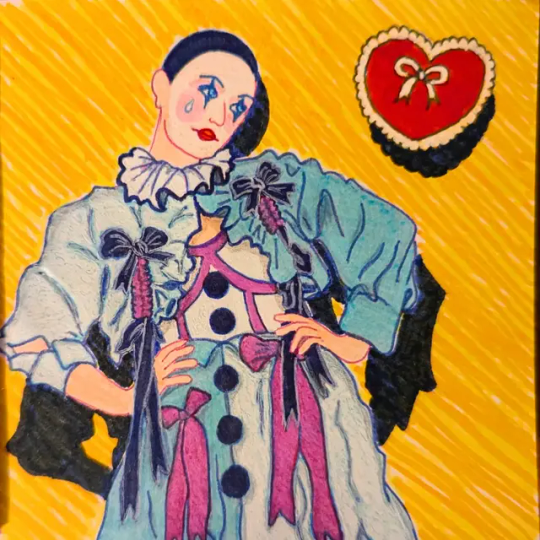
Day 9: Fashion 🧵🪡
#clown month 2024#artists on tumblr#illustration#blacksheepbones on Instagram has the pattern/tutorial for the ruffle bow shirt and skirt#I will make this shirt when I learn how to sew
67 notes
·
View notes
Text
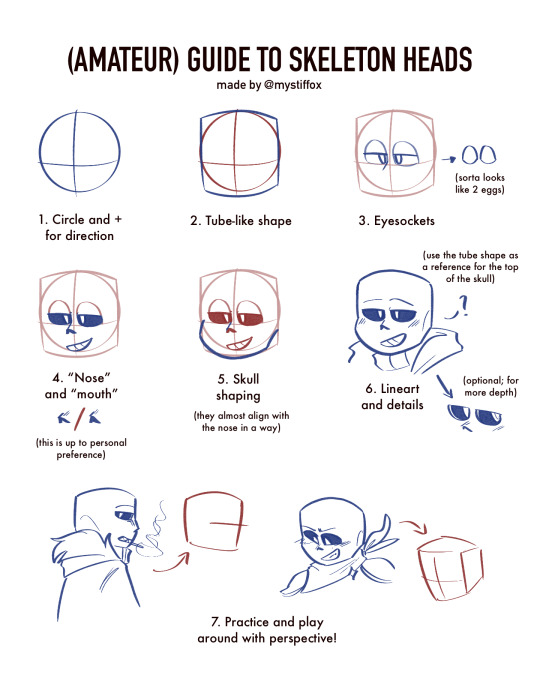


— the (amateur) (unreliable) (silly) guide to the sans skull
take all of this with a grain of salt! i admire all yall who draw him and i don't intend to compete with that ever. just make me your artist for humanized designs /lh

see my beef with his dumb skull has always been there i just learn how to hide it better lol. srsly props to yall who can draw him easily i have to redo the top part of his skull like 5 times at minimum. but its not like i hate that i cant draw him, i just think that if i wanna draw for myself, im gonna own it and make it how i wanna and if that means human designs, so be it! its called free will🙏
#mystfox art#blue's verse#shoutout to the artfight msg that prompted me to ask on instagram if people wanted a tutorial#i had to make it silly#bc ive been posting human designs more nowadays so i am not a reliable person for advice HAHA#if you wanted to really learn just do art studies! just dont copy people's fanart and make it ur own ♡♡#undertale au#utmv#bluesonas#sans undertale#underfell sans#underswap sans#human sans#human design#art guide#<- but very unreliable
23 notes
·
View notes
Text
instagram
insta reel by easyastryyt on how to fold cardstock into squares you can attach to each other and make 3d pixel art models in real life
#insta reel#stardew valley#minecraft#papercraft#paper art#art diy#art idea#art tutorial#craft tutorial#Instagram
23 notes
·
View notes
Text

2014 faded grunge Instagram filter ♡
Someone in my inbox asked me to make a faded grunge filter, but tumblr glitched when I was looking for my master post link; and erased the ask and my post ughhh! 😭 Sooo, to the person who asked, here you gooo <3
Feel free to check my masterlist of filters here! 💗

Filter: Willow: 50
Brightness: -30
Contrast: -30
Warmth: -30
Fade: 80
* you can adjust these settings to your liking!
💋 Taglisters: @2543jj @lou007sstuff @cottoncandywhispers
#grunge filter#2014 filter#grunge#2014 grunge#grunge aesthetic#grunge tumblr#rosy blog#2014 aesthetic#2013 aesthetic#i miss 2013#2014#2013#2014 tumblr#2013 tumblr#2015#2014 filters#2014 grunge filter#2014 faded grunge filter#2014 filter tutorial#instagram filter#2014 instagram filters#2015 instagram filter#2014 instagram#2014 fashion#tumblr 2014#2014 revival#bring back 2014#i miss 2014#2014 girl#2014 nostalgia
135 notes
·
View notes